
Music Genre : POP
 |
| 1. choose flash file(actionscript3.0) |
 |
| 2. edit the size-320x240 |
 |
| 3. file > import > import to stage |
 |
| 4. choose file |
| 5. select the image > modify> transform > rotate 90 CCW |
 |
| 6. rename the background |
 |
| 7. choose ALIGN > 1. choose match size > 2. choose align ( to fix the picture in the frame ) |
 |
| 8. modify > convert to symbol |
 |
| 9. rename the symbol (background) > type(movie clip) |
 |
| 10. insert frame at 300th frame |
 |
| 11. click new layer > rename ( typewriter) |
 |
| 12. insert keyframe at 5th frame |
 |
| 13. select text tool > edit properties > choose dynamic text > family:28 days later , size:25, color : white , format : center , behavior : multiline |
 |
| 14. enter an alphabet at each keyframe |
 |
| 15. select last 2 keyframe and copy it |
 |
| 16. paste the copied keyframes afterward |
 |
| 17. insert keyframe at 158th frame of background layer |
 |
| 18. color effects > style(brightness) > bright (-44%) |
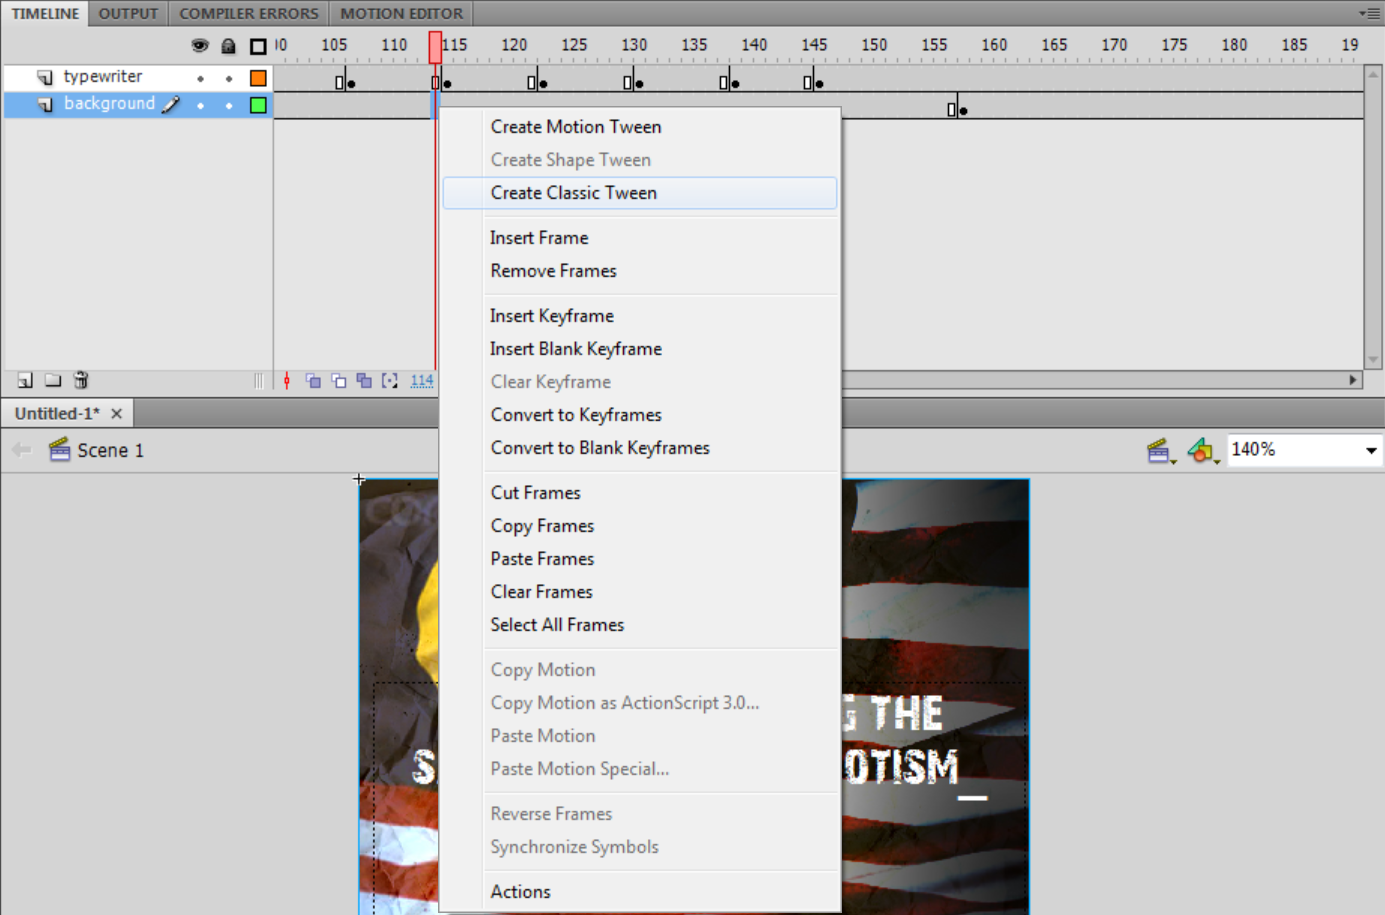 |
| 19 . right click > create classic tween |
 |
| 20. insert 2 frames at each of the typerwrite's frames to slow down the speed of text |
 |
| 1. file > import > import to library |
 |
| 2. choose file |
| 3. insert keyframe > drag the picture to stage from library > free transform tool > resize&rotate |
 |
| 4. modify > convert to symbol |
 |
| 5. name (tadau1) > type ( movie clip) |
 |
| 6. color effects > style (alpha : 43) |
 |
| 7. insert keyframe > color effect ( alpha : 100) > filters (glow & drop shadow) |
 |
| 8. drop shadow |
 |
| 9. insert keyframe > color effects ( alpha : 1) |
 |
| 10. create classic tween |
 |
| 11. repeat the steps above (step 3-6 ) > insert keyframe > color effect (alpha : 100) > filters ( glow & gradient glow) |
 |
| 12. gradient glow |
 |
| 13. repeat the steps above (step 3-6) but is convert to button > insert keyframe > color effect (alpha :100) > filters ( glow & bevel ) > create classic tween |
 |
| 14. bevel |
 |
| 15. new layer (action) > insert keyframe |
 |
| 16. action frame > insert the script ( kid1= the name of button , rOver= name of th e mouse when it hover button , alpha-= 0.1(decrease alpha by 10%)/ 1 = 100% |
 |
| 17. drag all the vectors from AI to stage one by one > rearrange the keyframes > convert all into symbol (movie clip ) |
 |
| 18. circle 4 > 1st keyframe > color effect ( brightness -44 ) > insert 2nd keyframe > color effect ( brightness 1 ) > create classic tween |
 |
| 19. circle 7 > 1st keyframe > colour effect ( none ) > 2nd keyframe > color effect ( alpha 70 ) > 3rd keyframe > color effect ( alpha 100 ) |
 |
| 20. circle2 > 1st keyframe > color effect ( none ) > 2nd keyframe > color effect ( brightness -48 ) > 3rd keyframe > color effect ( brightness 5 ) |
 |
| 21 . circle 6 > 1st keyframe > color effect ( alpha 100) > 2nd keyframe > color effect ( alpha 30 ) > 3rd keyframe > color effect ( alpha 100 ) |
 |
| 22. insert keyframe > 1st keyframe > color effect ( brightness -44) > 2nd keyframe > color effect ( brightness -94 ) > 3rd keyframe > color effect ( brightness 0 ) |
 |
| 23. create 4 new folders ( button , circle's symbols , pictures , picture's symbols ) > categorized every layers into each group |
| 1. new layer (text)> insert keyframe > select type tool > edit properties > insert text > select free transform tool (resize) |
 |
| 2. modify > convert to symbol > name (say )> type ( movie clip) |
 |
| 3 . filters > glow |
 |
| 4. create motion tween > |
 |
| 5. motion preset > fly-in-left |
 |
| 6. subselection tool > drag it to adjust the path of the movement |
 |
| 7. new layer > rename(text2) > edit properties |
 |
| 8. modify > convert to symbol > name (no) > type ( movie clip) |
 |
| 9. click the text > filters > glow > drop shadow > bevel |
| 10. keyframe > free transform(small) > top right |
| 11. insert keyframe > free transform (medium) > center |
| 12. keyframe > free transform (big) > center (full frame) |
 |
| 13. click at the keyframe > create motion tween |
 |
| 14. new layer (text3) > insert keyframe > select type tool > edit properties > insert text |
 |
| 15. click text > filters > glow >drop shadow > glow > bevel |
 |
| 16. new layer(text4) > insert keyframe > edit properties > insert text > click text > filters |
 |
| 17. click text > ctrl+B x2 (to break apart) |
 |
| 18. select eraser tool > press F6 (insert keyframe) + erase in each keyframe (start from back to front) |
| 19. drag the splatter from AI to stage > free transform tool (resize) > convert to symbol (splatter) > display (blending : substract) |
| 20.drag the splatter2 from AI to stage > free transform tool (resize) > convert to symbol (splatter2) > color effect |
 |
| 21. color effect > style(alpha) > alpha (21%) |
 |
| 22. create classic tween |
| 23.drag the splatter3 from AI to stage > free transform tool (resize) > convert to symbol (splatter3) > blending(add) |
 |
| 24. create motion tween > last keyframe > color effect (brightness : -11 ) >display (blending :add) |
| 25 .drag the splatter4 from AI to stage > free transform tool (resize) > convert to symbol (splatter4) > color effect (alpha :58) > blending(add) > 2nd & 3rd keyframe > color effect (85) > blending(add) |
 |
| 26. create classic tween |
| 27.drag the splatter5 from AI to stage > free transform (resize) > convert to symbol ( splatter5) > brightness (51) > blending (overlay) > brightness (85) > blending (overlay) |
 |
| 28. create classic tween |
 |
| 1. file > import > import to library |
 |
| 2. create new folder (sound) > put all the sound into this folder > each sound can be play by click play button on top right |
 |
| 3. new layer (typerwrite) > insert keyframe > drag sound from library to stage |
 |
| 4. edit sound > properties > click on the pencil icon |
 |
| 5. new layer (camera sound ) > repeat the steps ( step 3-4 ) |
 |
| 6. drag the vertical line at the frame there to edit sound |
 |
| 7. insert 3rd keyframe > edit envelope > drag vertical line to edit sound |
 |
| 8. insert 5th keyframe > repeat the step 7 |
 |
| 9. new layer ( bubble sound ) > repeat the steps ( step 3 ,4 ,6 ,7) |
 |
| 10. new layer ( kick sound ) > repeat the steps ( step 3 ,4 ,6 ,7) |
 | ||||||||||||||
11. edit the envelope > drag the line in the left and right channel > fade in & fade out ( to adjust volume)
sound effects - bubble http://soundbible.com/1137-Bubbles.html - camera click http://soundbible.com/330-Camera-Click.html - Roundhouse Kick http://soundbible.com/1000-Roundhouse-Kick.html - Tiny Button Push http://soundbible.com/419-Tiny-Button-Push.html - Typewriter And Bell http://soundbible.com/853-Typewriter-And-Bell.html - many punches http://soundbible.com/1409-Many-Punches.html |


